VPS搭建Nextcloud网盘
上一篇我说过,可以通过Aria2来离线下载任何你想下载的东西,终于不用再忍受迅雷和百度云的下载约束。这一篇来讲讲,如何推翻百度云,搭建属于自己的云盘。
国内的云盘大部分都在接受检查,原因你懂得,好像只有百度云大行其道。但百度云时不时地篡改你的资源,不成为会员,就必须忍受坑爹的下载速度,在线看个视频都卡得不要不要的,都让我已经对它失望至极。有没有一款属于自己私人的云盘呢,不再会被乱删资源,不必忍受网速的限制,答案是有的,就是我今天要介绍的这款,Nextcloud。
Nextcloud的前身叫Owncloud,因为管理团队的分歧导致Owncloud最终被卖给了别的公司,而且越来越商业化,而Nextcloud的创始人带着当时的创始团队,又开创了Nextcloud的公司,它是完全免费开源的。这么看有点像Oracle收购MySQL的意思,MySQL的作者后来又开创了MariaDB一样。
讲完了历史,现在来看看Nextcloud究竟有哪些特色。Nextcloud是一款定位类似于Dropbox、GoogleDrive以及国内百度云的产品。它可以实时同步你的资料,让你的资料备份于云端,再也不用担心因为某些误操作导致的数据丢失。同时它支持在线查看资料,在线收看视频,可以说省了很多安装各种功能APP的存储空间。最最重要的是,它是完全私人的,只属于你的云盘,因为它需要你去购买属于你的VPS,然后在上面搭建。
下面就开始介绍如何在VPS上搭建Nextcloud云盘。我的VPS的操作系统是CentOS 6,并不完全适用于CentOS 7,但是可以用来参考。关于如何购买VPS和操作VPS,可以参考我的这篇文章。
1.安装Nginx
网上有关于LNMP的一键安装包,搜一搜就能找到一堆,跟着做就行。因为我之前装过Nginx,并且已经处于使用当中,所以得要分开搭建。首先,VPS自带Linux系统,接着安装服务器。服务器可以选择Apache也可以选择Nginx,我选择的是Nginx,可以参考我的这篇来安装Nginx。
2.安装PHP 5.6+
CentOS 6上的PHP版本相对较旧,最新的Nextcloud对PHP的最低要求是PHP 5.6+,那就装一个5.6版本的PHP吧,下面是Nextcloud 12.03版本最低配置要求
- Server: Linux (Debian 7, SUSE Linux Enterprise Server 11 SP3 & 12, Red Hat Enterprise Linux/CentOS 6.5 and 7 (7 is 64-bit only), Ubuntu 14.04 LTS, 16.04 LTS)
- Web server: Apache 2 (mod_php, php-fpm) or Nginx (php-fpm)
- Databases: MySQL/MariaDB 5.5+; PostgreSQL; Oracle 11g (currently only possible if you contact us https://nextcloud.com/enterprise as part of a subscription)
- PHP 5.6 + required
- Hypervisors: Hyper-V, VMware ESX, Xen, KVM
- Desktop: Windows XP SP3 (EoL Q2 2015), Windows 7+, Mac OS X 10.7+ (64-bit only), Linux (CentOS 6.5, 7 (7 is 64-bit only), Ubuntu 12.04 LTS, 14.04 LTS, 14.10, Fedora 20, 21, openSUSE 12.3, 13, Debian 7 & 8).
- Mobile apps: iOS 7+, Android 4+
- Web browser: IE11+, Microsoft Edge, Firefox 14+, Chrome 18+, Safari 7+
更具体的信息请查看官网。
首先执行命令
1 | yum install https://dl.fedoraproject.org/pub/epel/epel-release-latest-6.noarch.rpm |
,安装EPEL和remi源。虽然PHP官方不推荐使用remi源,但是CentOS 6上的可以用的PHP源基本都低于 5.6版本,无法满足最新的Nextcloud的配置需求。
因为我VPS已经安装EPEL源了,可以通过命令来查看
1 | ls /etc/yum.repos.d/ -l |
看看有没有叫做epel.repo的文件,如果有就说明不用下载了。接下来安装yum-utils工具,执行命令
1 | yum install yum-utils |
。通过命令
1 | yum info <packagename> |
可以查看具体的包安装情况。我的VPS里已经自带了yum-utils工具,所以不必下载,推荐在使用yum install前,先执行yum info来查看是否有这个包。接下来需要配置系统php的版本,我使用的是php 5.6,执行命令
1 | yum-config-manager --enable remi-php56 |
最后安装php模块,看看官网是怎么说的
Required:
PHP (>= 5.6, 7.0 or 7.1)
PHP module ctype
PHP module dom
PHP module GD
PHP module iconv
PHP module JSON
PHP module libxml (Linux package libxml2 must be >=2.7.0)
PHP module mbstring
PHP module posix
PHP module SimpleXML
PHP module XMLReader
PHP module XMLWriter
PHP module zip
PHP module zlib
Recommended packages:
- PHP module curl (highly recommended, some functionality, e.g. HTTP user authentication, depends on this)
- PHP module fileinfo (highly recommended, enhances file analysis performance)
- PHP module bz2 (recommended, required for extraction of apps)
- PHP module intl (increases language translation performance and fixes sorting of non-ASCII characters)
- PHP module mcrypt (increases file encryption performance)
- PHP module openssl (required for accessing HTTPS resources)
可以通过命令
1 | php -m | grep -i <module_name> |
来查看php模块的安装情况。我把推荐的和必须的都安装了
1 | yum install php php-xml php-gd php-posix php-libxml php-mbstring php-mcrypt php-intl php-mysql php-fpm |
其中,像php-mcrypt模块还需要依赖libmcrypt包,必须先安装libmcrypt才行。可以访问这个网址去下载相应的包来安装。
3.配置PHP-FPM
php-fpm会协同nginx一起运行,修改配置文件
1 | vim /etc/php-fpm.d/www.conf |
找到user = apache和group = apache这两行,将其修改为
1 | user = nginx |
找到listen = 127.0.0.1:9000这行,确保该行没有被注释掉,目的是保证php-fpm运行在指定端口。
接着找到注释行,取消注释,启用php-fpm的系统环境变量。
1 | env[HOSTNAME] = $HOSTNAME |
保存之后,在/var/lib/php/目录下新建一个文件夹session,并将其拥有者变更为nginx用户。
1 | mkdir -p /var/lib/php/session |
最后启动php-fpm和nginx
1 | service nginx start |
,至此php-fpm配置完成。
4.安装MariaDB 5.5+
首先创建一个文件/etc/yum.repos.d/MariaDB.repo
1 | vim /etc/yum.repos.d/MariaDB.repo |
,内容如下
1 | [mariadb] |
接下来安装MariaDB,
1 | yum install MariaDB-server MariaDB-client -y |
安装完成之后,启动mariadb
1 | service mysqld start |
5.配置MariaDB
接下来需要配置MariaDB的root用户密码,执行命令
1 | mysql_secure_installation |
键入y,然后设置MariaDB的root密码,
1 | Set root password? [Y/n] Y |
这样就设置好了密码,现在登录到 mysql shell 并为 Nextcloud 创建一个新的数据库和用户。这里我创建名为 nextcloud_db 的数据库以及名为 nextclouduser 的用户,用户密码为 nextclouduser@。当然了,要给你自己的系统选用一个更安全的密码。
1 | mysql -u root -p |
输入 MariaDB 的 root 密码,即可登录 mysql shell。
输入以下 mysql 查询语句来创建新的数据库和用户。
1 | create database nextcloud_db; |
nextcloud_db 数据库和 nextclouduser数据库用户创建完成
6.下载安装Nextcloud
推荐不要直接下载发行版本,因为发行版本里貌似没有对3rdparty的依赖文件,直接使用git下载
1 | git clone https://github.com/nextcloud/server.git |
虽然官网号称3rdparty依赖已经过时,但是我在执行程序的时候,还是有对3rdparty的依赖存在。
将下载的文件夹重命名为nextcloud,并且移动到nginx目录下
1 | mv server/ nextcloud/ |
,然后为nextcloud目录创建一个data文件夹,并且变更nextcloud目录的拥有者为nginx用户和组。
1 | mkdir -p /usr/share/nginx/html/nextcloud/data/ |
7.为Nextcloud生成一个自签名SSL证书
在教程中,我会让客户端以 https 连接来运行 Nextcloud。你可以使用诸如 let’s encrypt 等免费 SSL 证书,或者是自己创建自签名 (self signed) SSL 证书。这里我使用 OpenSSL 来创建自己的自签名 SSL 证书。
为 SSL 文件创建新目录:
1 | mkdir -p /etc/nginx/cert/ |
如下,使用 openssl生成一个新的 SSL 证书。
1 | openssl req -new -x509 -days 365 -nodes -out /etc/nginx/cert/nextcloud.crt -keyout /etc/nginx/cert/nextcloud.key |
最后使用 chmod 命令将所有证书文件的权限设置为 600。
1 | chmod 700 /etc/nginx/cert |
8.在Nginx中为Nextcloud配置虚拟主机
接下来要为Nextcloud配置一个虚拟主机。在 Nginx 的 conf.d 目录下创建一个新的虚拟主机配置文件 nextcloud.conf。
1 | vim /etc/nginx/conf.d/nextcloud.conf |
将以下内容粘贴到虚拟主机配置文件中:
1 | upstream php-handler { |
这里我没有直接指向443端口,因为443端口被我的goproxy-vps程序给占用了。取而代之的是修改了Nginx的配置,从而释放出443端口来。修改/etc/nginx/nginx.conf配置文件,让其指向新建的/etc/nginx/conf.d/nextcloud.conf配置
1 | #include /etc/nginx/conf.d/*.conf; |
然后重启nginx,
1 | service nginx restart |
9.访问Nextcloud
万事具备,只欠东风。访问 https://yourvpndomainname ,会进入Nextcloud第一次的配置页面。
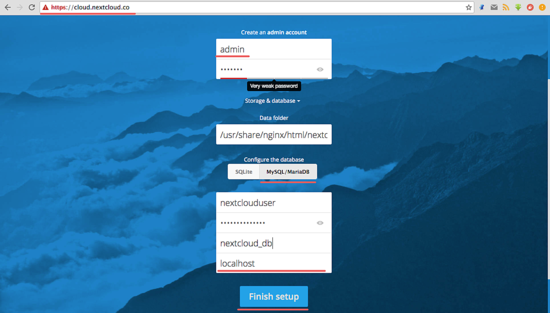
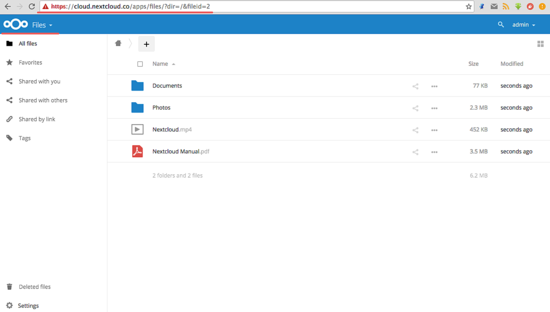
耐心等待配置完成,接下来就好好享受你的私有云盘吧。
参考文档
- http://www.linuxprobe.com/centos7-nginx-nextcloud.html
- http://www.sohu.com/a/150781293_610730
- http://www.bijishequ.com/detail/321569?p=
- http://www.jianshu.com/p/446f3705a156
- http://garry-huang.blogspot.ca/2017/06/centos-7-nextcloud-collabora-office.html
- https://docs.nextcloud.com/server/12/admin_manual/installation/nginx.html

chilihotpot
You Are The JavaScript In My HTML